AI image generation that actually matches your brand
Introduction
LLM chat and prompt -> image generation is everywhere now. The problem is most people stop there, and the output looks random. The style drifts. Characters change between shots. Colors don’t match the brand. You end up spending more time re-rolling images than actually shipping work.
This is a practical walkthrough for getting quality while keeping brand consistency, by using the right tool for each stage: generation, LoRA training (if you own the style/character), and specialised editing models for inpainting, outpainting, context replacement, segmentation, and upscaling.
Brand consistency
Let’s say your brand has a recurring set of characters, for example our characters, Al and Min appear in blog posts, ads, and eventually videos. You want each new image to look like it belongs in the same environment:
- Same faces and proportions
- Same outfit design (or at least consistent clothing language)
- Same color palette and lighting mood
- Same art style (line weight, texture, background treatment)
If you only use a text prompt, you can get a nice single image, but you will struggle to get a repeatable series and character that align to your brand. That’s where “specialised models + a workflow” matters.
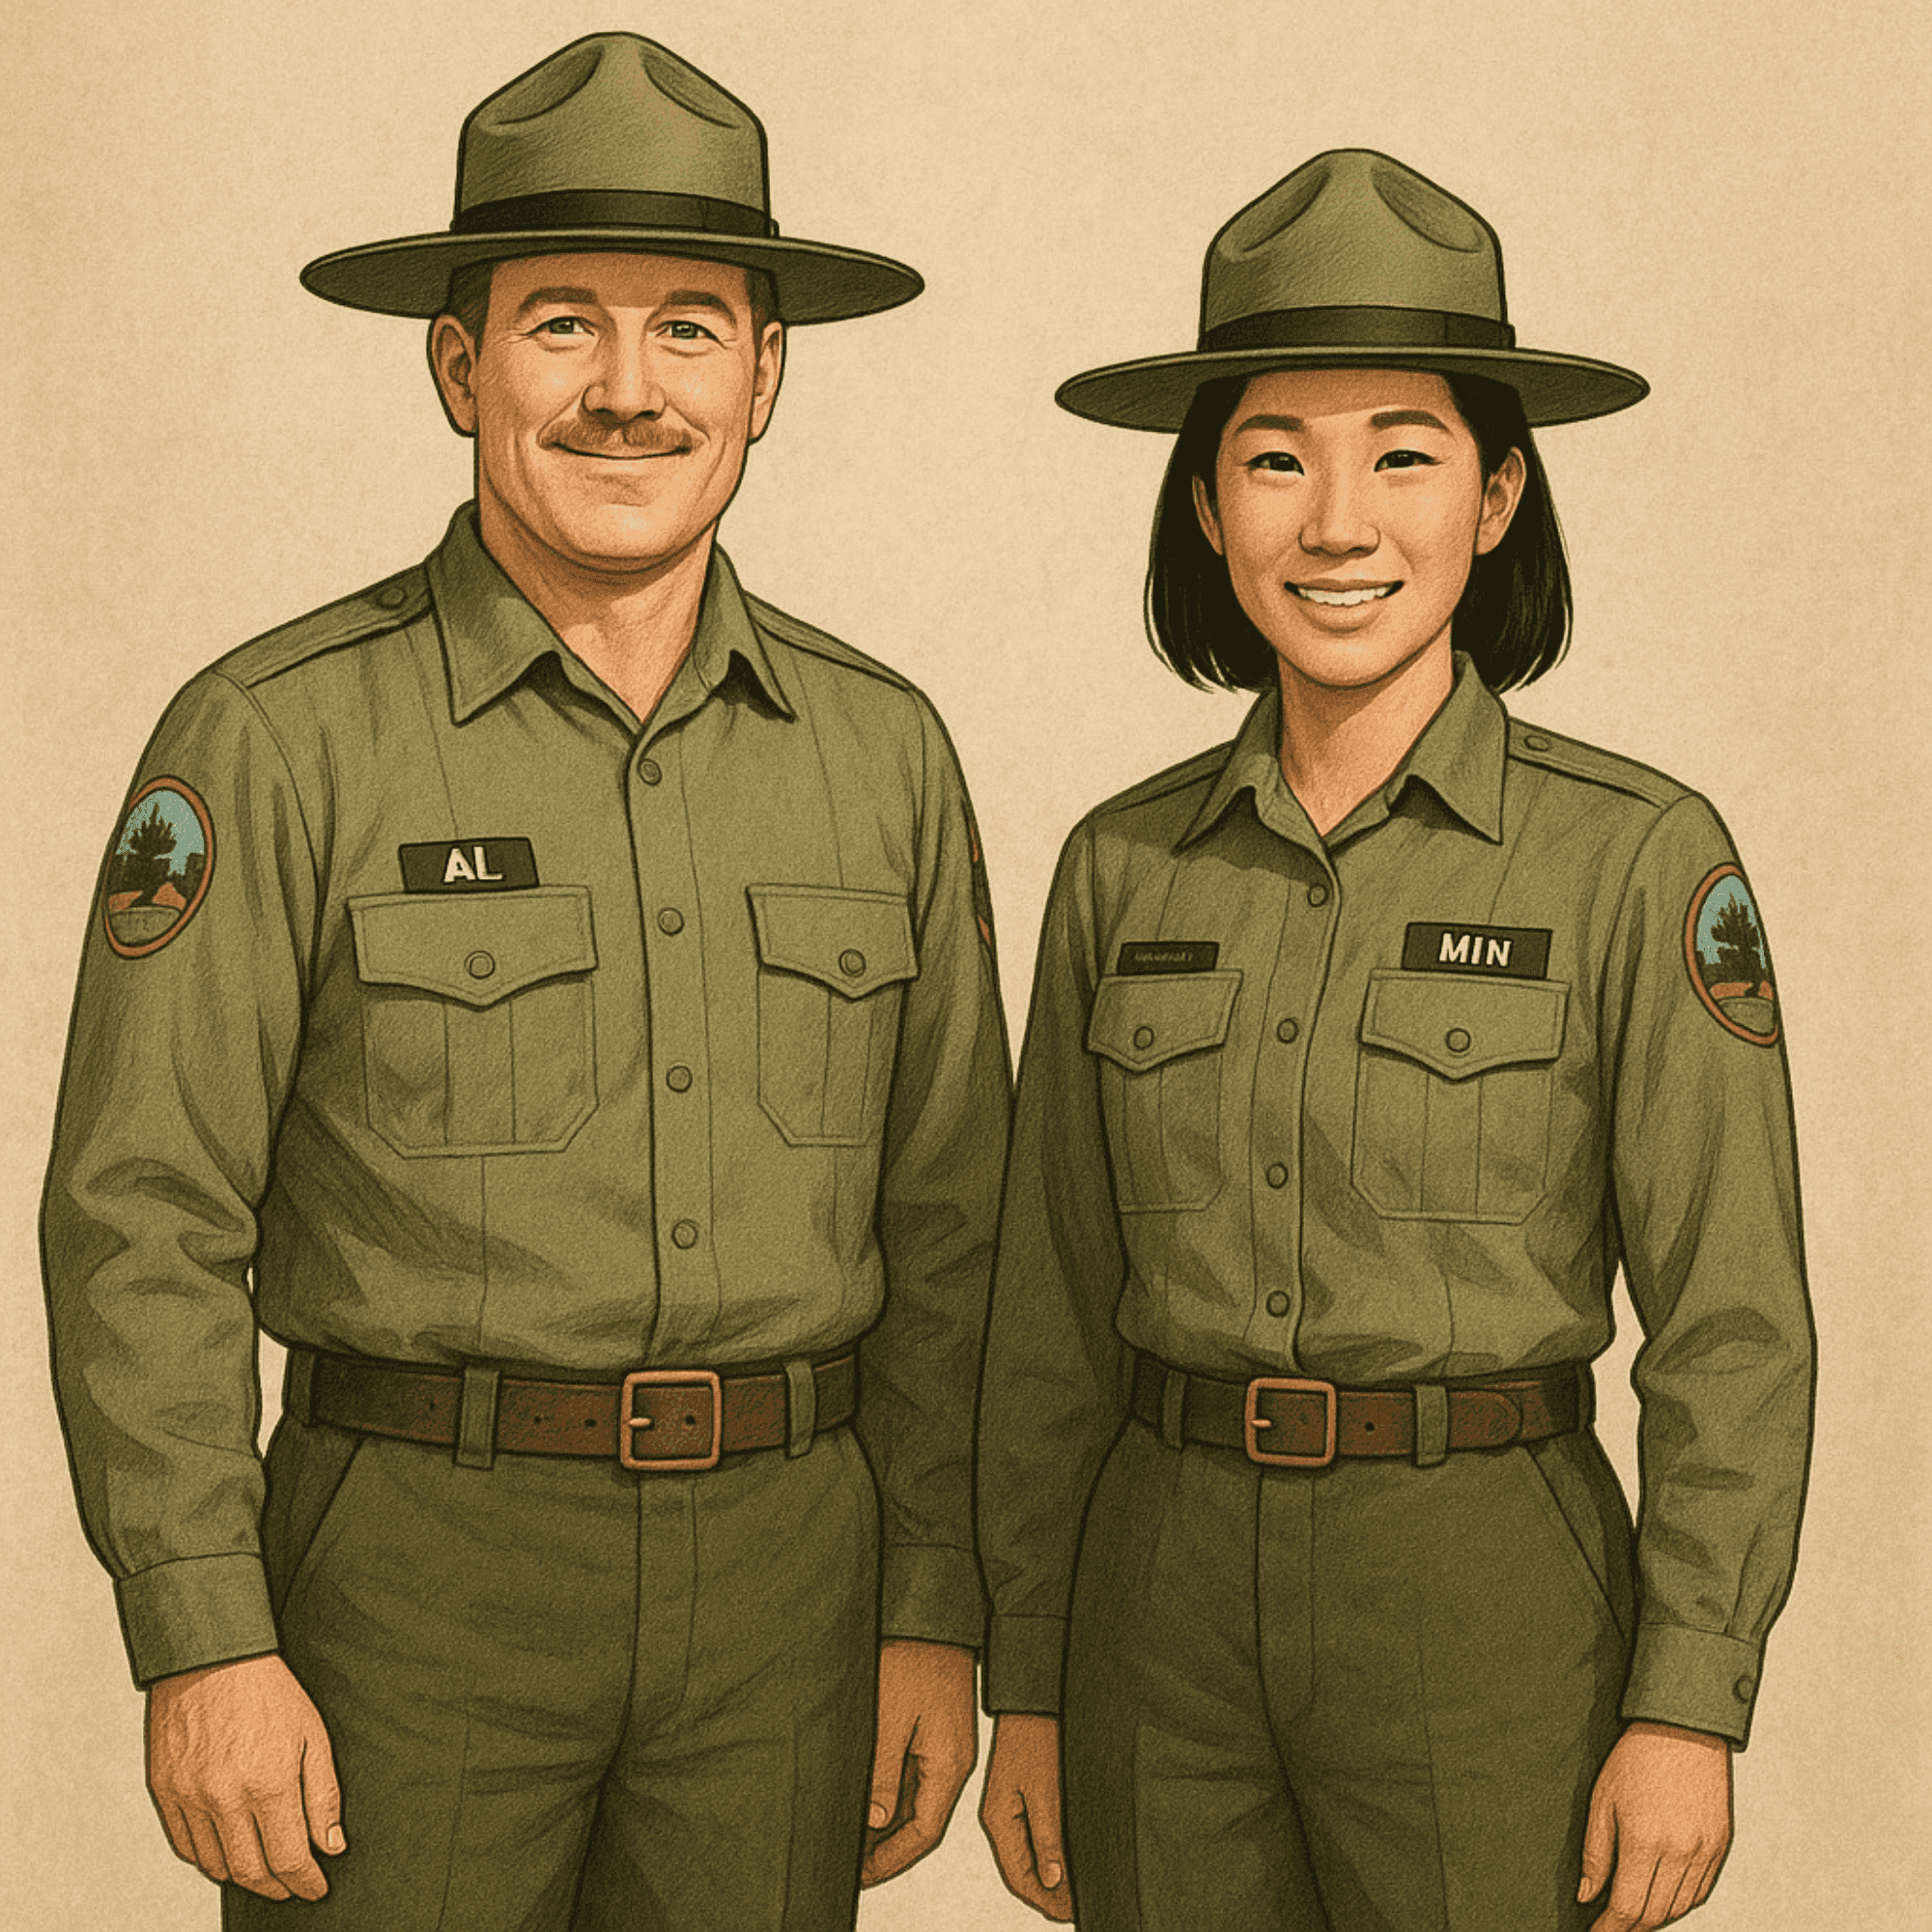
Create an image of Al and Min is standing side by side facing the viewer — ChatGPT
The workflow
To generate images with quality and adhere to brand guidelines, here’s the process I follow:
- Create the prompt (human)
- Refine the prompt (LLM assistance)
- Generate the base image (model, often with LoRA for brand assets)
- Edit the image (specialised editing models: masking, context replacement, etc.)
- Post-process (human adjustments and brand checks)
It’s not complicated. The win is choosing the right model at each step instead of forcing one model to do everything. This not only improve the image quality, but reduces the cost of using single image model.
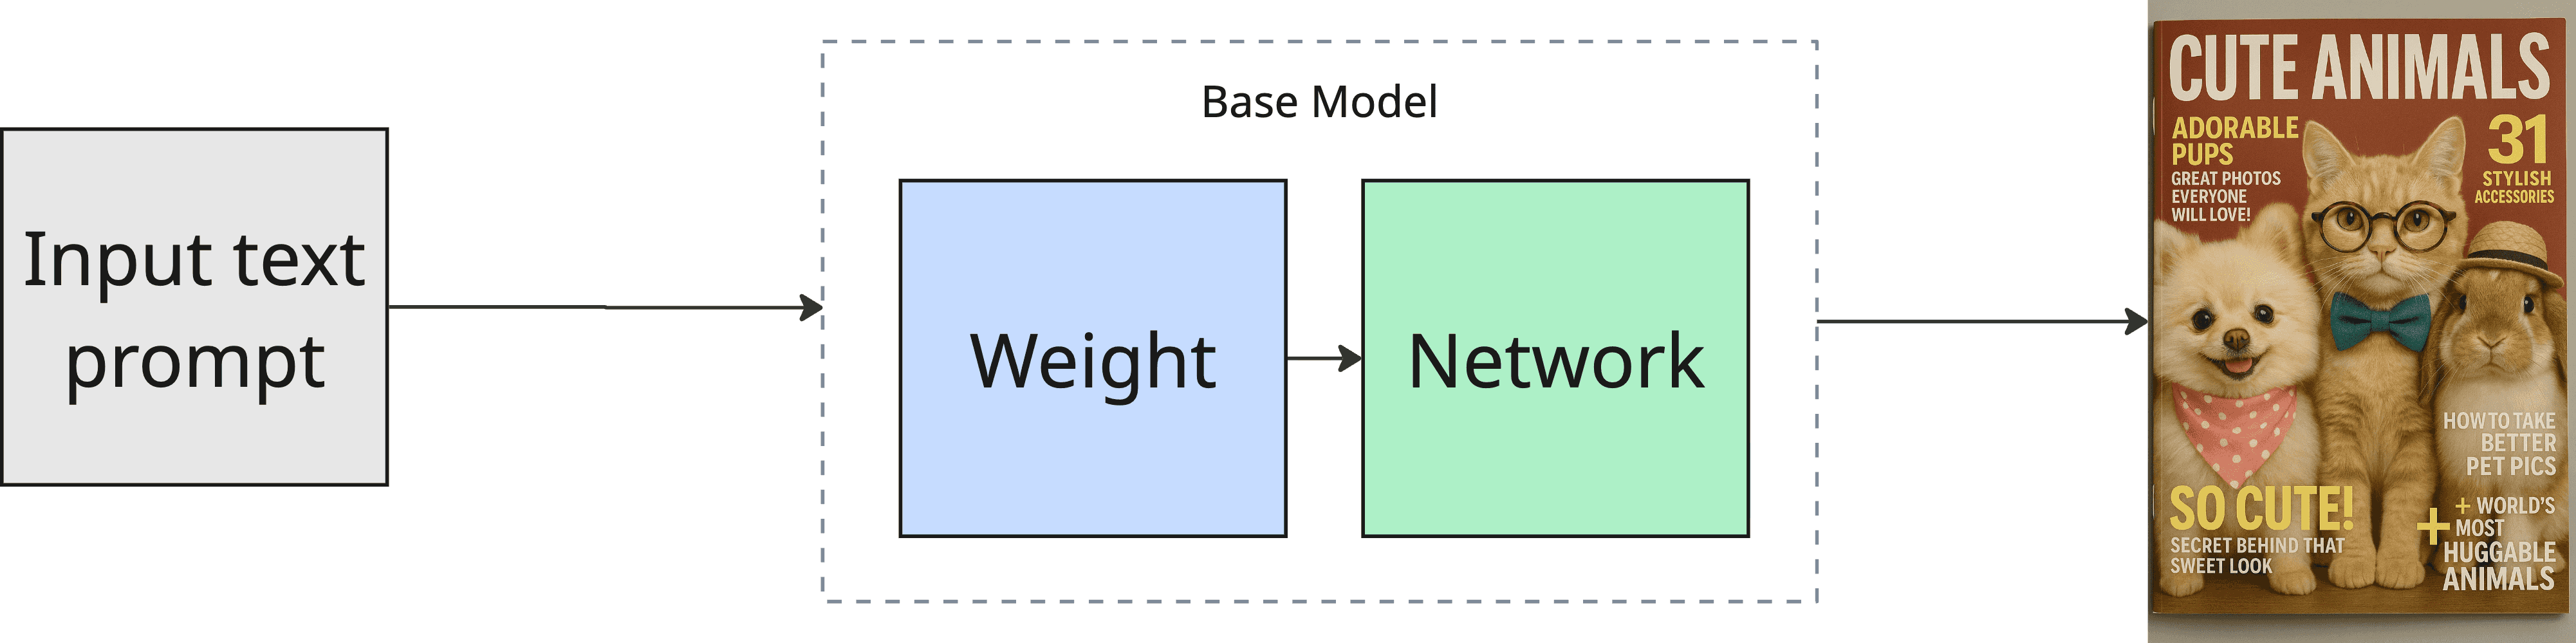
Step 0: Understand what you’re working with (base models)
When you generate an image, you’re using a base model (network + trained weights). Your text prompt gets converted into embeddings, and the model predicts an image step by step. If you want characters and style that are not commonly found in public datasets, you would expect the base model try to “guess” and generate a random character style that different from your expectation.
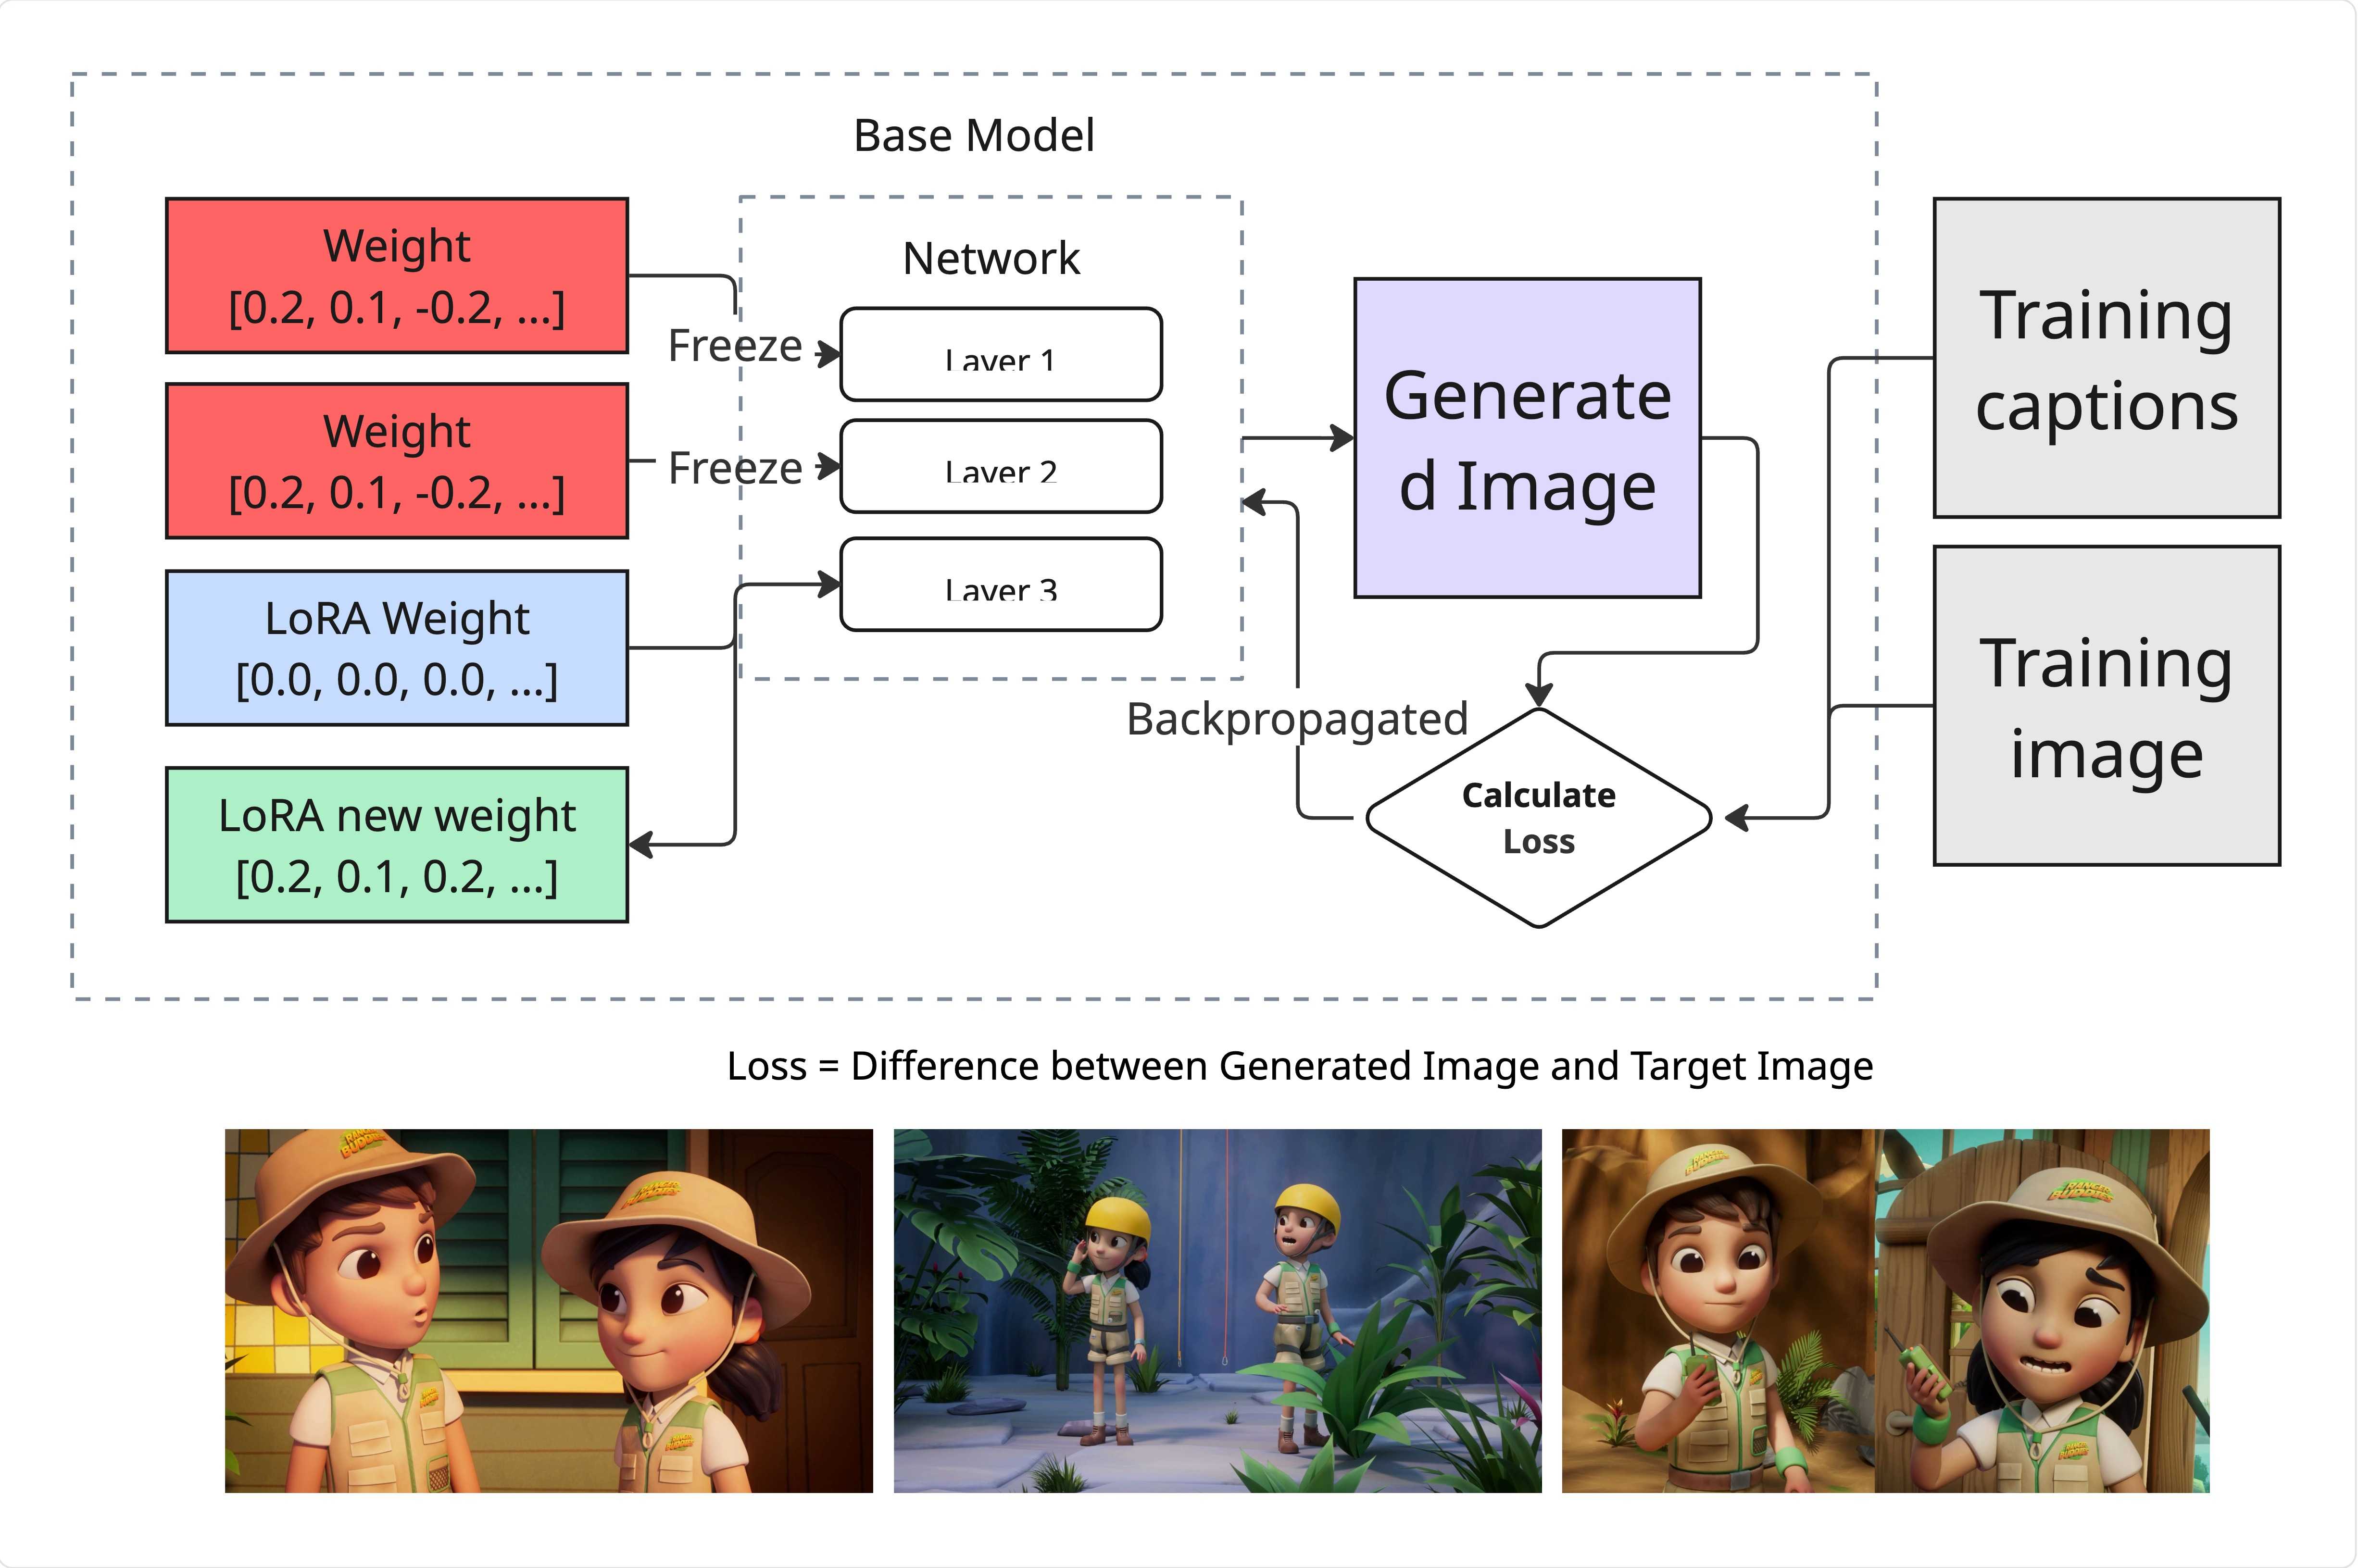
This is where LoRA comes in for brand assets: instead of having the base model “guess” your brand’s style or characters, you can teach the model exactly what you want (see Step 3.1).
Step 1: Create a prompt that matches brand rules
Most prompts are missing the brand constraints. Add them explicitly.
For the Al and Min example, instead of prompting “two characters standing side by side”. Say what your brand cares about.
Here’s a prompt template you can reuse:
Subject:
- Al and Min, full body, standing side by side, facing viewer

Brand style constraints:
- [your style keywords: e.g. clean vector, soft shading, thick outline, flat background]
- color palette: [your palette words or hexes if you have them]
- lighting: [soft studio light / warm sunset / neon night]
- mood: [friendly, playful, confident]

Composition constraints:
- centered composition, consistent proportions, readable silhouette
- keep faces consistent, avoid extra fingers, avoid warped text

Background constraints:
- [plain / simple gradient / light environment], no clutter
This sounds basic, but it changes the output a lot. You’re telling the model what not to drift on.
Step 2: Refine the prompt using an LLM
This is where the LLM is useful: tightening wording, removing ambiguity, and generating variations of the same intent.
What I ask the LLM to do:
- Keep the prompt short and unambiguous
- Preserve brand constraints and composition constraints
- Produce few variations
Important: don’t let the LLM add random “cinematic” fluff unless your brand actually wants it.
Step 3: Generate the base image (commercial vs open source)
There are two categories of image generation services you’ll run into: commercial and open source.
Commercial usually wins on raw quality and convenience. Open source wins on control and customization.
Here’s the straightforward tradeoff:
When commercial is the better choice
Use commercial when you need:
- High quality quickly
- General concepts (no proprietary character/style)
- Strong prompt adherence with minimal setup
Example Models: Google Gemini (“nano banana”), GPT-5.2.
When open source is the better choice
Use open source when you need:
- Your own character/style that the internet doesn’t have
- Flexibility (open weights, mix and match workflows)
- Fine-tuning (LoRA) for brand assets
- Fewer restrictions and predictable pricing
Example Models: Wan 2.2, Flux 2 Dev, Qwen Image.
For brand consistency (Al and Min), open source becomes valuable because you can train a LoRA.
Step 3.1: Train a LoRA for your brand characters
Training is simply: the model learns patterns from your data. In brand terms, this is “teach the model what Al and Min look like by using multiple references (images or videos)“.
Recommended training platforms:
- fal.ai
- RunPod
Model considerations (depending on your setup and goal): Qwen Image, Wan 2.2, Z-image.
Once you have a LoRA, you can attach it to the base model and are now able generate consistent character image with prompt. That’s the whole point for brand work.
Step 4: Edit the image using specialised models
Most people only know “chat back and forth until it looks right”. It works, but it’s slow and not precise.
The faster way is: decide the editing task, then pick a model designed for that task.
Below are some common image editing functions I use for image editing. While recent image model like Inpainting and Outpainting have been recently outpaced by the more common image model like all in one editting model, I am listing it out for side references. This isn’t exhaustive, but it covers most real workflows.
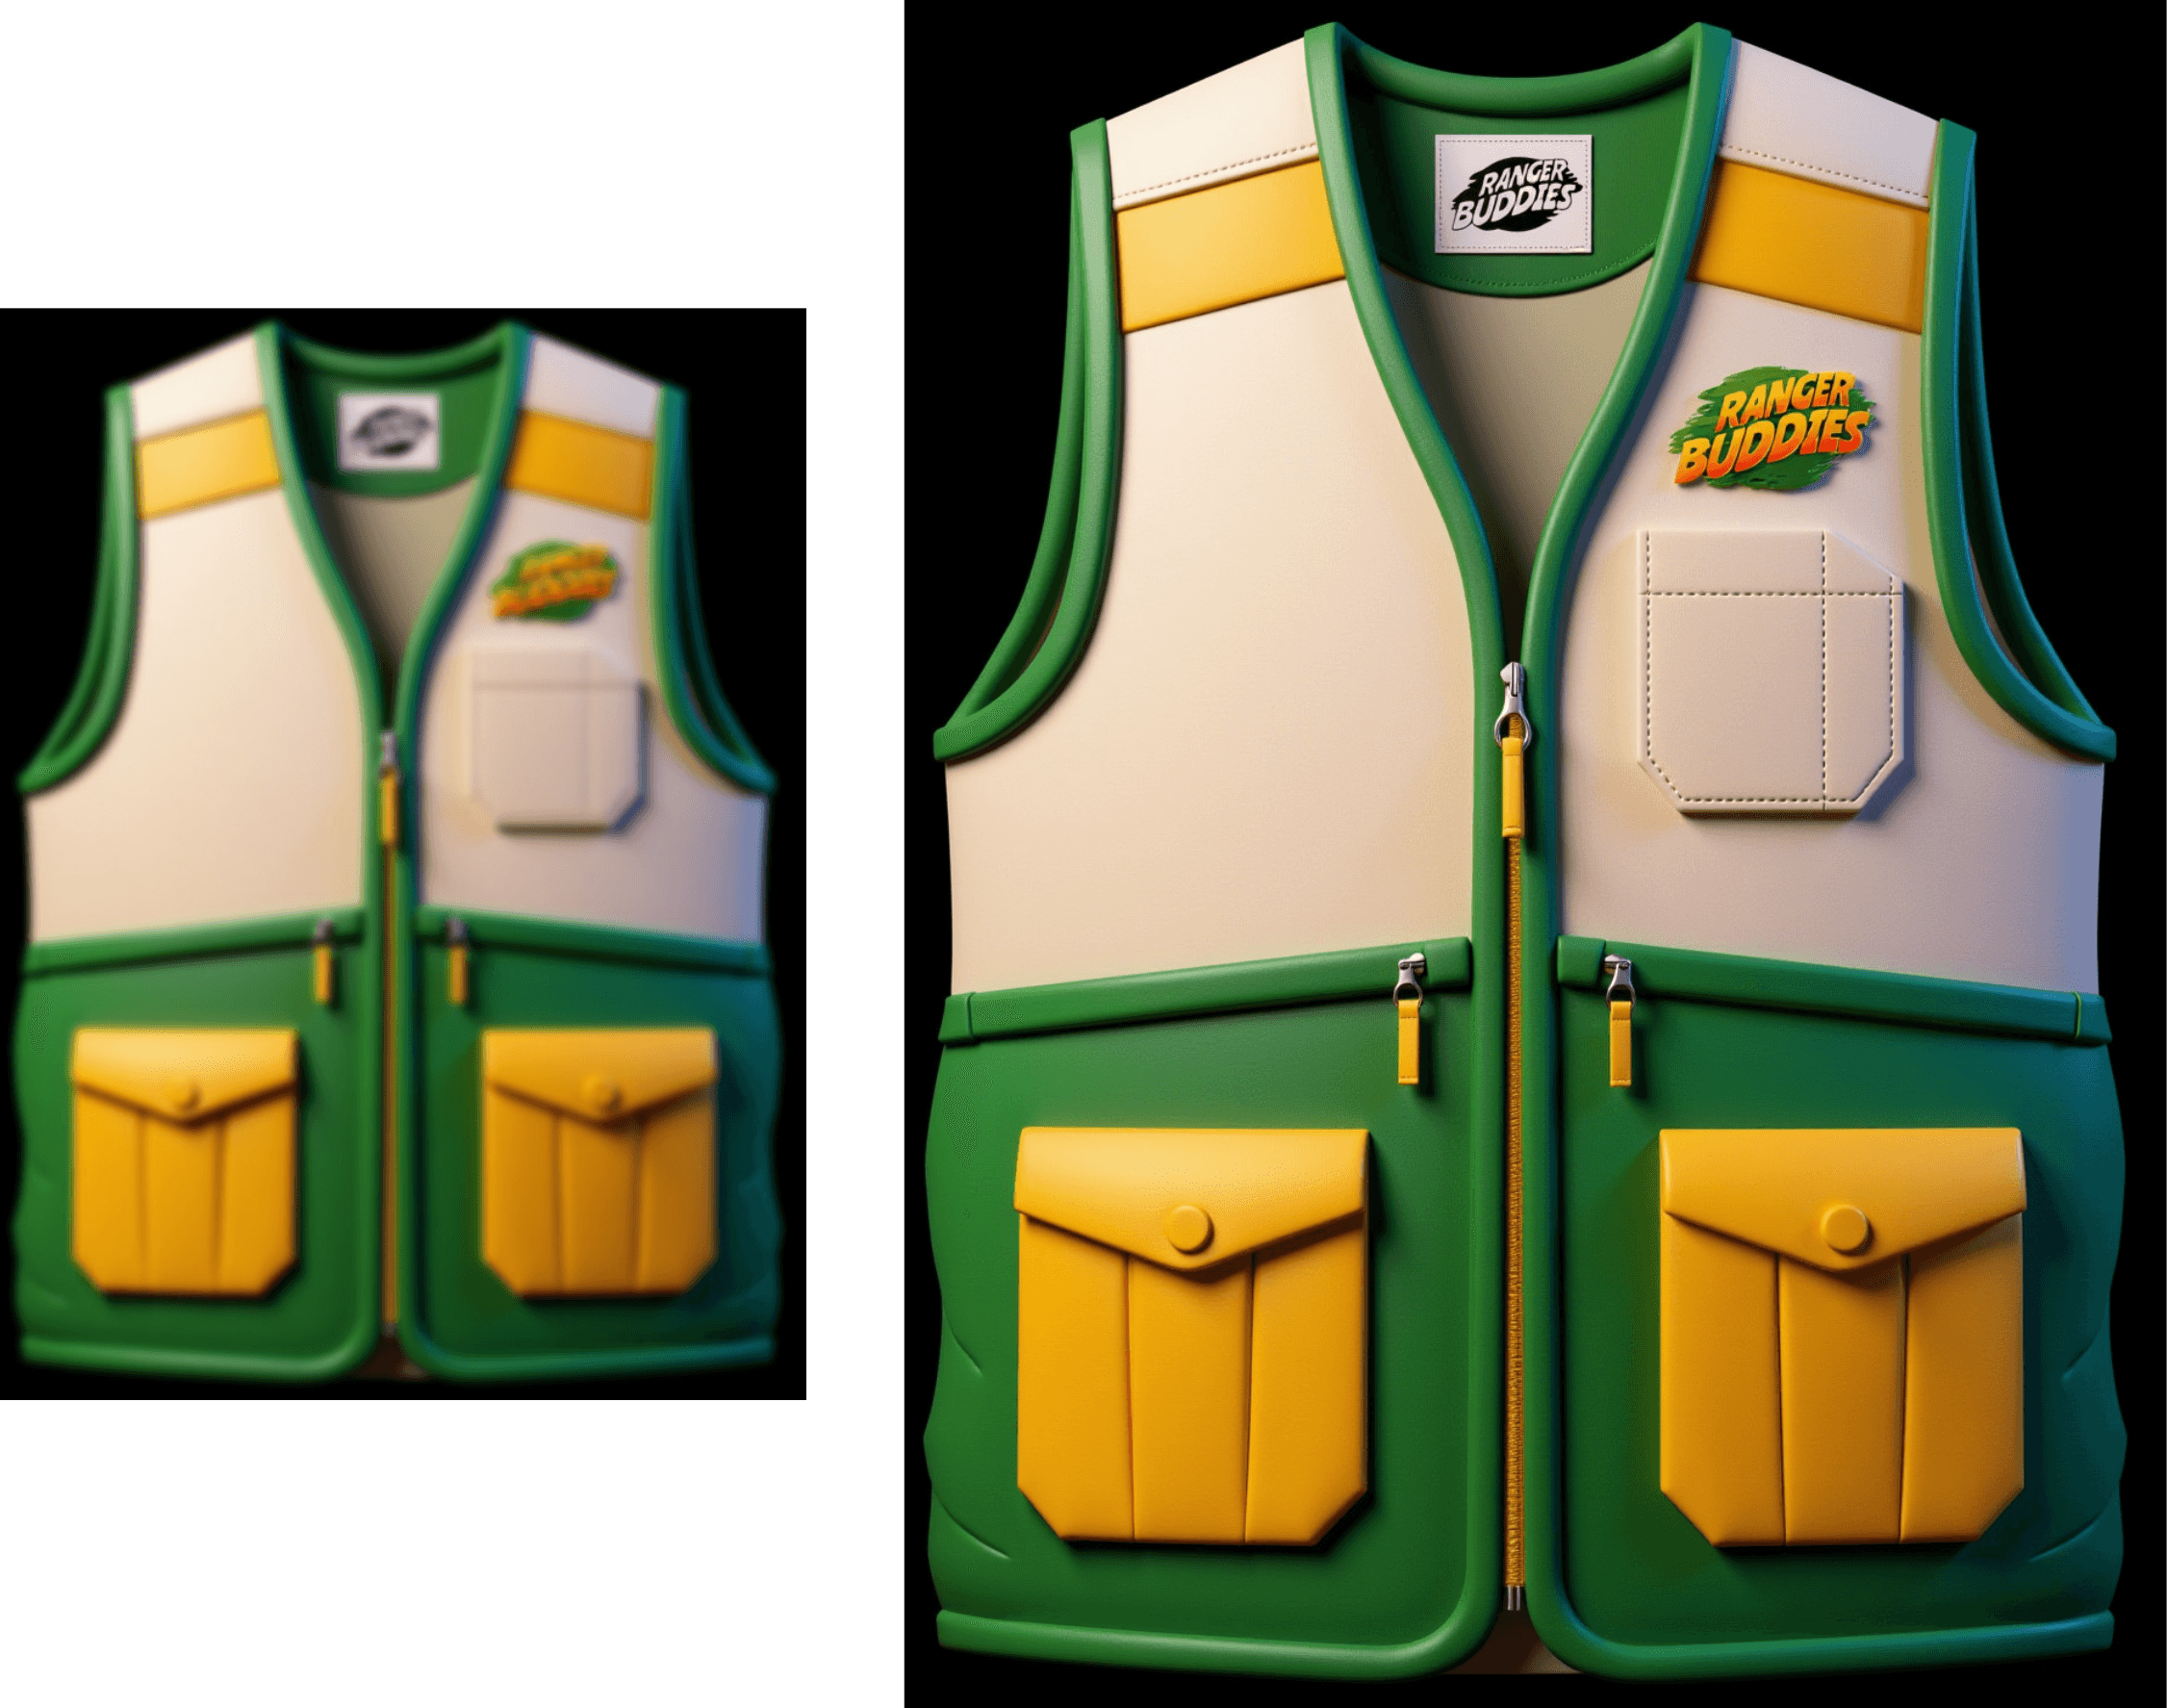
1) Inpainting (fix or replace a specific part)
Inpainting fills in missing or unwanted parts of an image.
Example: “Replace the vest with the new vest” and keep everything else unchanged.
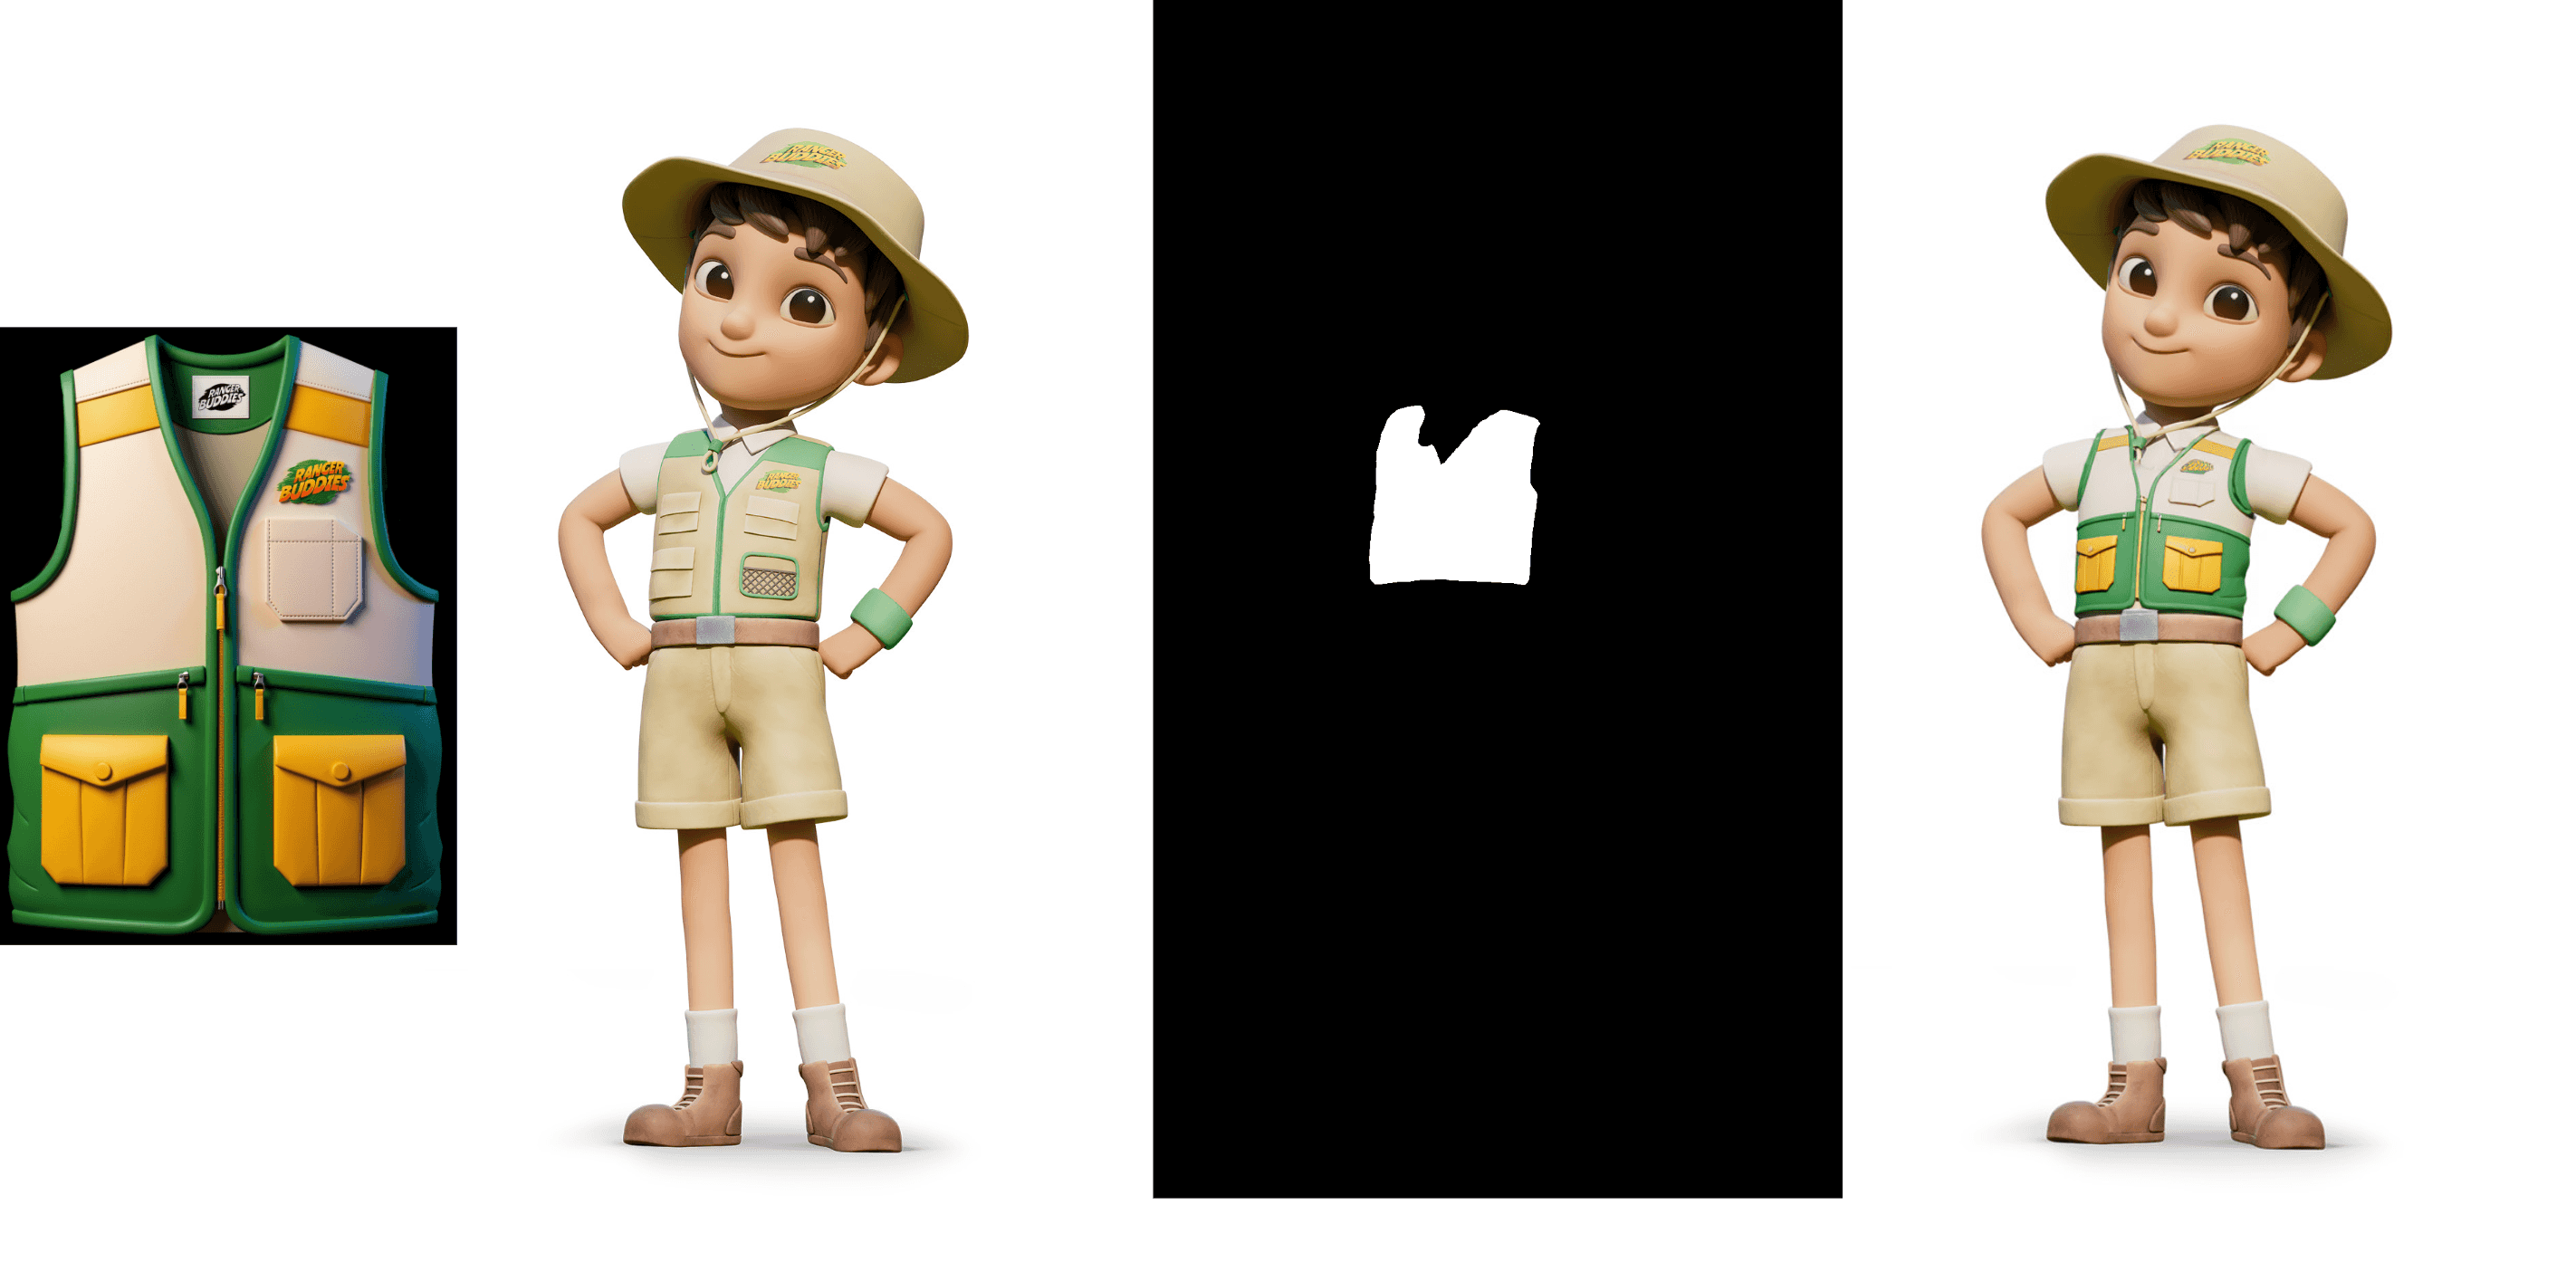
Inputs you usually need:
- The original image
- A mask for the area to modify
- A short prompt describing what the masked area should become
Why it helps with brand: you can update details (logos, outfit versioning, small props) without re-generating the whole image.
Model example: Flux.1 Fill
2) Outpainting (extend the canvas cleanly)
Outpainting extends the image beyond its borders.
Example: you generated a portrait, but you need a 16:9 banner. Outpainting “zooms out” and invents the missing context while matching the style.

Inputs you usually need:
- The original image
- Target aspect ratio / new size
- A short prompt for what should exist in the new space
Model example: Flux.1 Fill
3) Context replacement (edit the scene based on new instructions)
Context replacement changes parts of an image based on new instructions while keeping the rest intact.
Example: “Make the sky night instead of sunset” without re-drawing Al and Min.
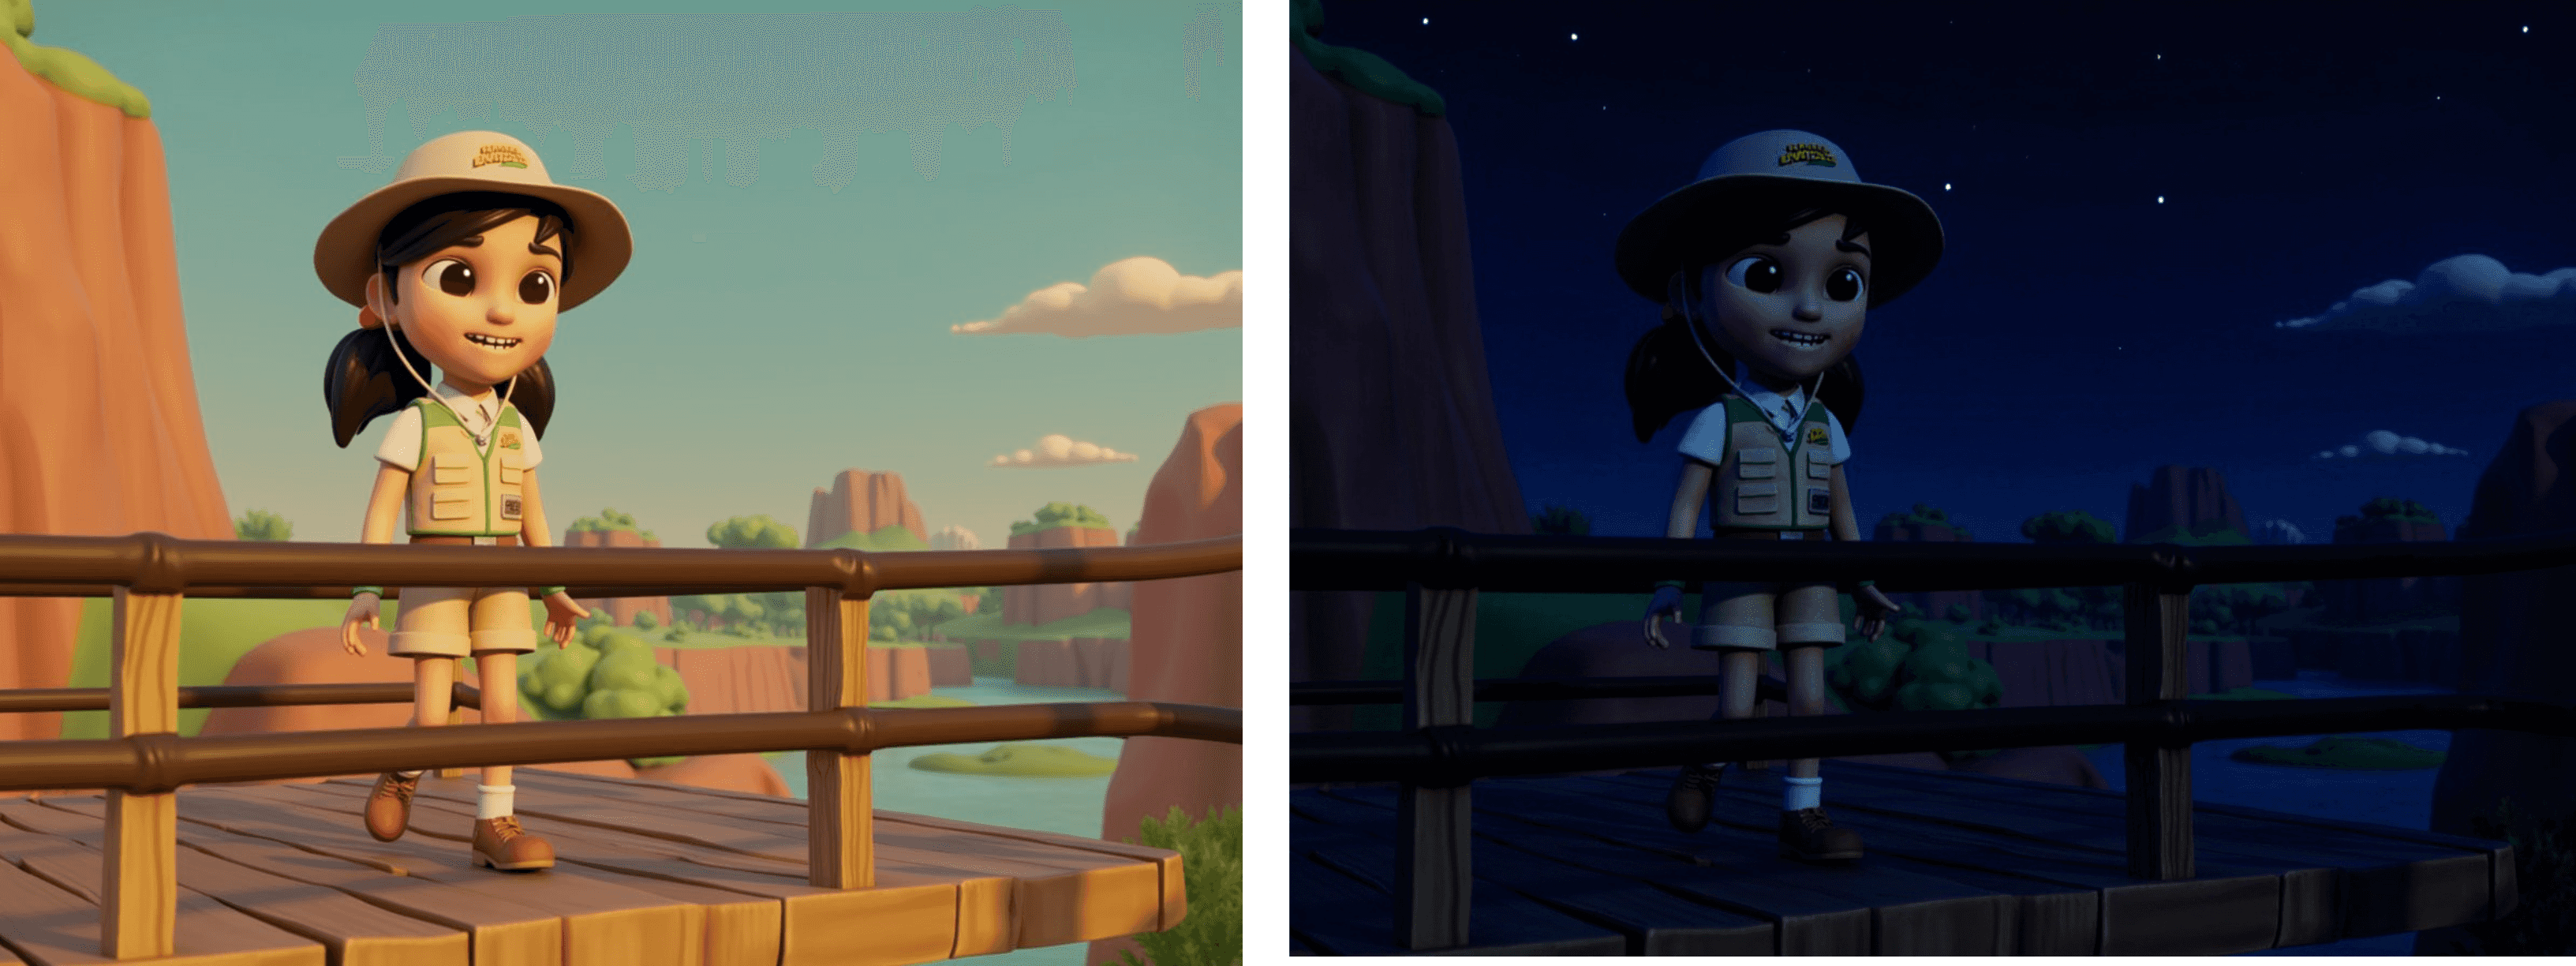
This is where strong commercial models often feel “magical”, because they’re trained to follow instructions while preserving identity and layout.
Model example:
- Commercial: Google Gemini Nano banana, GPT 1.5 Image
- Open source: Hunyuan Image 3.0, Qwen Image Edit
4) Segmentation (isolate the object you want)
Segmentation is for detecting and extracting objects or people cleanly.
Example: cut out Al and Min so you can place them on a new background, or prepare a mask for inpainting.

Input is typically:
- The image
- The object you want isolated (sometimes via a text prompt)
Model example: SAM3.
5) Upscale (increase resolution without modifying the style)
Upscaling makes images sharper and larger, and fills in missing detail.
Input is typically:
- The image
- Upscale multiplier (2x, 3x, 4x)
Model example:
- Commercial: Clarity upscaler, Topaz
- Open source: ESRGAN
Step 5: Post-processing (small edits that matter)
Even with good models, brand work still benefits from small human adjustments:
- Color correction to match brand palette
- Typography cleanup (if the image includes text)
- Logo adjustment
- Minor retouching (eyes, edges, artifacts)
- Export settings for the target platform (web vs ads vs print)
Conclusion
Open source + commercial is the best of both worlds.
Use open source when you need control and brand specific assets (especially LoRA). Use commercial when you need speed and high-quality edits with strong instruction following. The key is not picking one tool and forcing it to do everything. Pick the right specialised model for the job, and your output becomes both higher quality and more consistent.